Freestanding bathtubs are an elegant and timeless addition to bathrooms of all sizes and design styles. Installing the tub correctly is critical for ensuring that it lasts for years to come. But doing so also requires a certain level of knowledge and skill. Here’s how to install a freestanding tub in your bathroom, with tips from the experts.
Tub Type and Placement
First and foremost, you’ll want to understand which kind of freestanding tub you are working with. Different shapes and styles tend to look better in different areas of the bathroom, Quality Bath explains. While a roll top tub might work well in the center of the room, a more modern tub with square edges is best tucked in a corner near shelving and drawers.
Additionally, each tub type offers its own unique bathing experience. Clawfoot cast-iron tubs offer more straightforward, classic soaks in water that stays warm for hours. Modern tubs, on the other hand, might have jets or whirlpool features. Kathy Barnes at Better Homes and Gardens notes that jetted bathtubs require additional fixtures and tools for installation, with a pump, air switch and electric timer required. “Many pumps fit within the tub unit, but some manufacturers have remote-location pumps that can be placed up to 5 feet from the tub and hidden in a closet or vanity cabinet,” she explains.
Freestanding tubs offer the most flexibility in terms of where they are placed. Unlike built-in tubs, which require two or more walls between which they’re fitted, freestanding tubs don’t need a wall. Installing a tub beneath a window can take advantage of natural lighting, writes the team at supplier Hudson Reed. The tub can also be made the focal point of the space when centered in the middle of the bathroom.
ADM Bathroom Design also likes the flexibility in placement of freestanding tubs. “The beauty about most free standing bathtubs is that they are finished on all sides; this gives you the option of placing the bathtub in any locations with any direction.”
If you’re replacing an existing tub with a freestanding tub, you might have to slightly reroute your water pipes, explains premium quality delivery service Maykke. Rerouting the pipes can take a few days, so it’s important that you’ve prepared this step well before you’re ready to install the tub. When all the pipes are in order, you can successfully install your tub and have it up and working in no time.
You should also think about the placement of your home’s water pipes, and where you’d like the pipes to drain. This is important for guiding the position of the bathtub, explains Better Homes and Gardens writer Ann Wilson. You’ll want to think about getting the tub into the house, too, through doorways and up staircases. Older homes tend to be smaller, so it’s especially important to consider how you’ll get the new tub into the house without damaging any original wood or decor.

Floor Preparation
Your floor is a major factor in the proper installation of a freestanding tub. This is mainly because cast iron tubs are extremely heavy, as building expert Bob Vila points out.
Those made out of fiberglass tend to be much lighter, yet they don’t retain heat as efficiently as tubs made from cast iron. A bathroom on the second floor of an older home with hardwood floors has different installation requirements than a main floor bathroom with marble tile floor. Understanding the integrity of your bathroom’s walls and floors ensure that your tub doesn’t damage your home’s structure.
You must also consider the tub filler, which is often the biggest expense during a tub installation. Cost and comparison website Fixr explains that this is because it must be either brought up from the floor, or installed in the ceiling. Meanwhile, floor fillers require that the floor is finished around the extending pipes. Regardless of the filler you choose, it must be considered and implemented before the tub is installed.
The level of the bathroom floor matters, too. In fact, freestanding tubs really have no tolerance for uneven floors, writes the team at ArDan Remodel. If a tub is installed on a floor that isn’t level, it will need to be replaced immediately, which causes additional work, money and manpower. Minimize the chances of such a mistake by checking the floor during the demo stage, before any plumbing work has begun.
Faucet Drillings
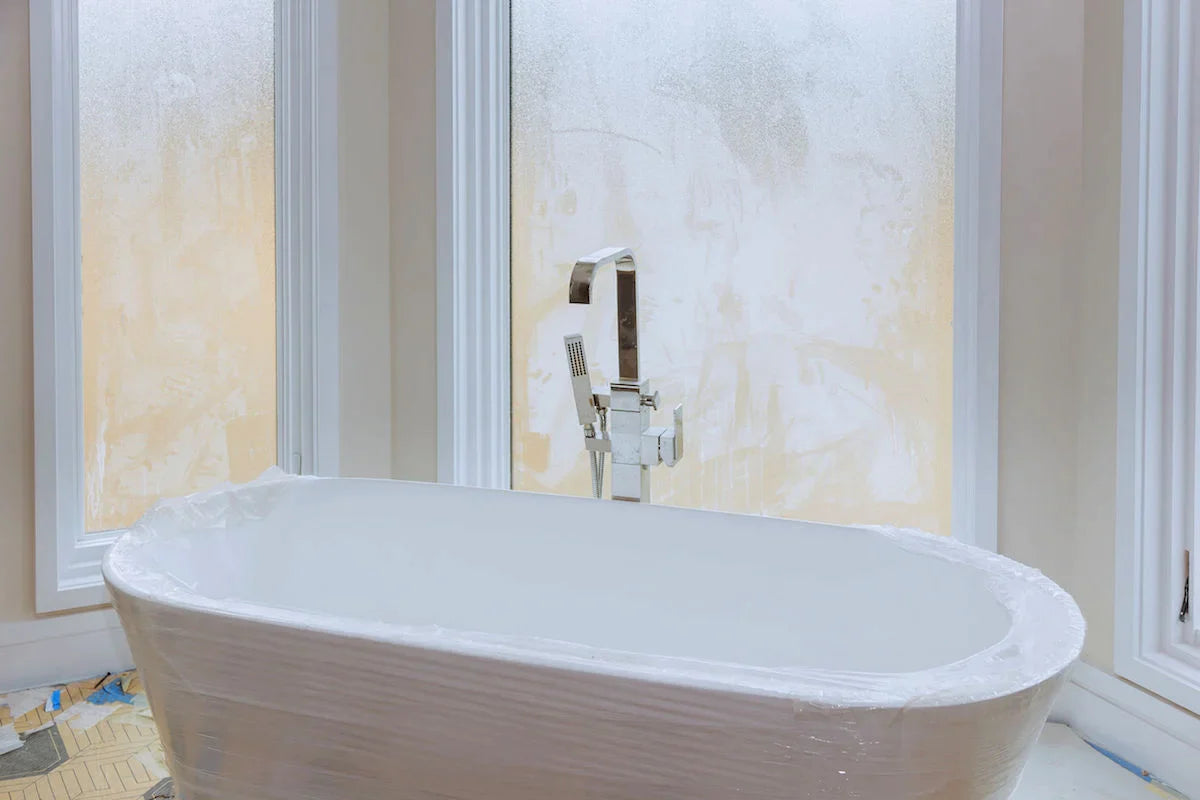
The installation process also requires that you consider your faucet type. According to Signature Hardware, a rolled rim bathtub doesn’t contain any faucet drillings. This type of tub features a continuous rim that’s rolled all around the surface.
Such a tub requires a freestanding tub faucet, but can also be fitted with a tub faucet mounted on a surrounding wall. In this case, you’d need to make sure that your tub is installed near a wall so that it can properly reach the faucet.
Another type of faucet is that which is mounted to the flat surface of the tub. A deck mounted faucet requires that you can access the underfloor of the bathroom, as you’ll need to connect the supply lines to the water source. “To ensure an accurate fit, measure the center measurement, or the distance between the two holes from center to center,” explains Vintage Tub and Bath.
Familiarizing yourself with the different parts of a faucet will also ensure proper installation. A breakdown of each part and its use can be found in an article from faucetlist.com. While different faucets have their own unique functions and styles, most freestanding tubs in this style contain a similar amount of parts.
The tub spout, for example, is where the water comes out when you turn the faucet on and it pours into the tub. The handshower is a handheld sprayer, and the valve connects to your home’s hot and cold water lines.
While not all freestanding tubs have a shower included, you might decide to install a showerhead, says Compact Appliance. Some bathrooms have a separate shower, which enables the tub to function only as a soaker. If you want the tub to double as a soaker, then, you’ll need to make sure the showerhead can be installed upright. Installing the tub near the wall, or implementing a rod to hold the showerhead, allows your tub to serve multiple purposes.

How to Start a Freestanding Tub Installation
After you’ve planned your tub placement and chosen your faucet type, you’ll be ready to install your freestanding bathtub.
Taking a detailed inventory of your plumbing status and fixtures ensures that you have all the right tools for a seamless operation. Ensure that you have all the proper accessories that need to accompany your tub, and check that its the right make and model you ordered, Badeloft USA suggests.
“Also inspect ancillary items shipped with the tub to ensure that they, too, are in good design and functional condition, and use this opportunity to re-tighten any parts that may have loosened during shipment,” they advise.
Another important way to ensure a smooth installation is to acquire all the necessary materials before hand. In addition to the bathtub and faucet, you’ll need cleaning supplies, silicone, plumber’s putty, caulk and a damp cloth, write the home improvement professionals at PJ Fitzpatrick.
Then, you’ll want to place the bathtub in the spot where you’d like to install it, with a blanket alongside. The tub can then be tipped onto the blanket, protecting both the floor and the finish of the bathtub. Once you’ve prepared the floor and plumbing, remove the blanket, stand the tub upright, and outfit it with fixtures and taps.
Images by: photovs/©123RF.com, NejroN/©123RF.com, iriana88w/©123RF.com